Not long ago, my colleague Chip and I visited a 600-cow dairy farm in Texas that was looking for some help. They were claimed to be struggling with these things:
What could be the underlying issues? We rolled up our sleeves to find out.
Being hoof trimmers by trade, the hoof issue was the first thing we examined. We visited the footbath first. It was being used frequently and at the proper concentration levels with a programmed footbath dosing system running HEALMAX® Footbath Concentrate. After footbath inspection, we asked the herdsman to take us to the stalls and walk us through the entire milking process so we could gain a clearer picture of the operation. The herd was about to go in for its second milking, giving us a perfect view of the operation.
In the barn, the stalls were very clean. The floor was only a couple of years old and still in great shape. We followed the cows’ path from the barn, then down a path outside and into the holding pen. Observing the outside path, we noticed the herd was walking on the edges of the lane instead of spreading out over the path; some cows were walking with a gait. We also noticed that just beyond the path, there were a few knocked-over trees and brush piles. In talking with the manager, we learned a nasty rainstorm had blown down the trees and caused some small-scale floods on the farm. We also learned he and another employee trimmed in-house and, if they noticed foot issues, their plan of action was an increase in footbath days.
We immediately recommended he bring in an outside hoof trimmer (not us, our days of trimming are for younger folks) to take a look at the herd due to the gaits we noticed. Then we looked closer at the path and realized the camber (sloped angle of the path) appeared to be off. Now cows love walking on flat surfaces, but when outside, a path must have a slight camber (less than 8 degrees) for water runoff. Anything more than that causes the cow to be uncomfortable walking. Her reaction will be to slow down and try to find the flattest part on which to walk. Due to the storm, it appeared the path was eroded, and the camber was 13 degrees.
The herdsman said he noticed the cows all started walking down the same side of the path each time they came in the pen, but he thought it was just a weird habit they developed. This habit ended up being developed because they weren’t comfortable with the angled surface which, in turn, forced the herd to slow down movement to the pen. Angled surfaces also play a role in hoof health. If a surface is uneven or rough, it can cause parts of the hoof to become uneven, creating pressure points which can lead to an array of hoof issues. We recommended fixing the path as soon as possible and to bring in an outside hoof trimmer to inspect the herd.
Once the herd reached the pen, they all started to settle in. This farm had a round pen with an electric push-button back gate. An ideal pen gives cows about a yard between each other, and this pen checked that box. (If a pen is tight, the cows get uncomfortable and uneasy.)
As the herd was allowed into the parlor, down the alley towards the footbath, the herdsman operated the push-button back gate. The gate was moving about a yard every five seconds but would only advance with another push of the button. This is something we recommend on larger farms, as a turn-on switch that automatically moves at a linear pace of 1 yard every five seconds has the potential to physically touch the cows in the back of the herd and not stop. The push button is preferred so you avoid the back gate from physically hitting and potentially harming the cows. This farm’s pen was set up the exact way we would have set it up, and it moved on to the alley toward the footbath.
The herd as a whole was slow to move into the building from the pen, even though the lead cow moved in pretty quickly, and the alley was roughly 5 yards wide. When we made our way into the building, we noticed how much darker the entrance was compared to being outside. Cows, by nature, do not like the dark. Going from a bright location (such as outside) to a dark indoor area makes them hesitant. I recommended they switch to an LED bulb to brighten the area and ease the transition.
All of a sudden, there was a traffic jam in the alley, right at the footbath. The 5-yard-wide alley quickly funneled down to a single-yard width for the footbath. Cows had their heads up and didn’t want to go into the bath, halting them from entering the parlor. When the cow did go into the bath, some of the larger ones that had trouble fitting into the footbath alley slowed down and soiled the bath. Others would sprint just to get through it. This set-up clearly was not working for the herd. Our recommendations were to change the set-up.
After a few frustrating moments at the footbath, the cows made it to the parlor, which was about 20 years old. We noticed that some went right into the parlor to get milked, while the bigger cows moved slowly and needed extra encouragement to get into the stall. We stressed to the herdsman that cow comfort is extremely important in all areas of the farm. If the parlor stalls are uncomfortable, the cow will be slow to go into the stall; that stress interferes with milk letdown. He needs to make sure the entire process for the cow is a positive experience.
We sat down with the owner and head herdsman to share our conclusions:
1. Hoof issues: Hoof issues were most likely caused by the uneven path and poor flow through the footbath. The increased soiling in the bath can easily cause a footbath additive to lose its efficacy; further, cows sprinting through the bath most likely were not seeing proper absorption of the additive. The overall increase in time spent milking the herd was due to a lack of cow comfort. If the cows were comfortable, they would move at a solid pace from Point A to Point B. Once they start becoming uncomfortable, they slow down.
2. Decreased milk production and milking efficiency: We attributed the production decrease to a milk letdown interference. Cows were stressed before they entered the parlor. Combine that with a parlor stall designed 15 years ago for a smaller-sized cow, it’s no wonder the herd reduced production. We spoke about how important it was to make sure the cow was comfortable during the entire process from the stall to the parlor.
Our recommendation: Fixing the path, the lighting and the alley by the footbath should increase the pace/speed it takes the cows to get to the parlor.
About a month later, I came back to the farm at the owner’s request and noticed some changes. The dairy team changed the things within their ability, though bigger changes to the parlor will occur at a later point in time.
They fixed the path between the stall and pens, and now it had a camber of 5 degrees. The cows were now walking three to four cows wide down the path into the pen, at a nice pace, and the gait appeared to be gone. The parlor building switched to LED bulbs throughout the building, which brightened the place right up, and the herd exited the pen without issue into the alley.
Near the footbath, the traffic jam was no more. They changed the way the alley funneled so it was a more gradual decrease in width. The flow through the footbath was smooth, and the herdsman said soil load in the bath decreased. A call to the hoof trimmer was helpful in identifying uneven hooves and some underlying foot issues.
With all of these tweaks, the manager reported that the time it took to milk the herd dropped back down to 2.5 hours (saving him an hour) and milk production had increased. In the end, cows are happier, healthier and more productive, and the dairy manager has a few less headaches.
“That’s the way we have always done it.”
That is a very scary phrase. It typically implies that you are not changing or looking to improve. It can also imply that you have done it for so long, you may be getting lax in some areas and not realize it.
When it comes to a dairy’s clean-in-place (CIP) routine and products, “That’s the way we have always done it” could be costing you milk quality.
With money at stake, let us take a refresher on the CIP basics.
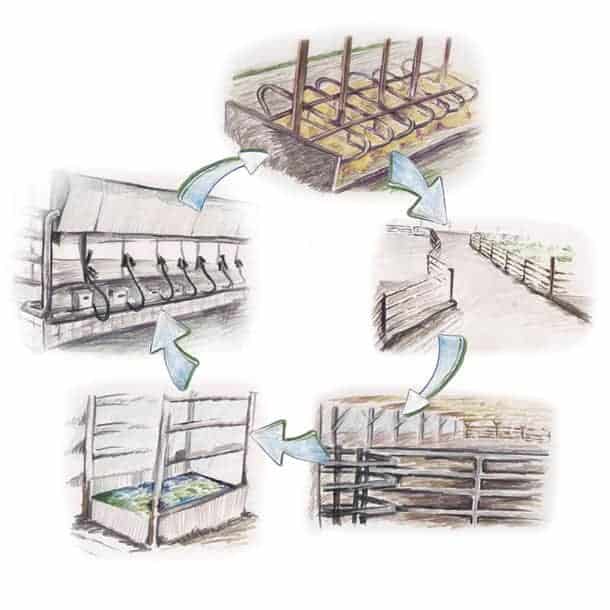
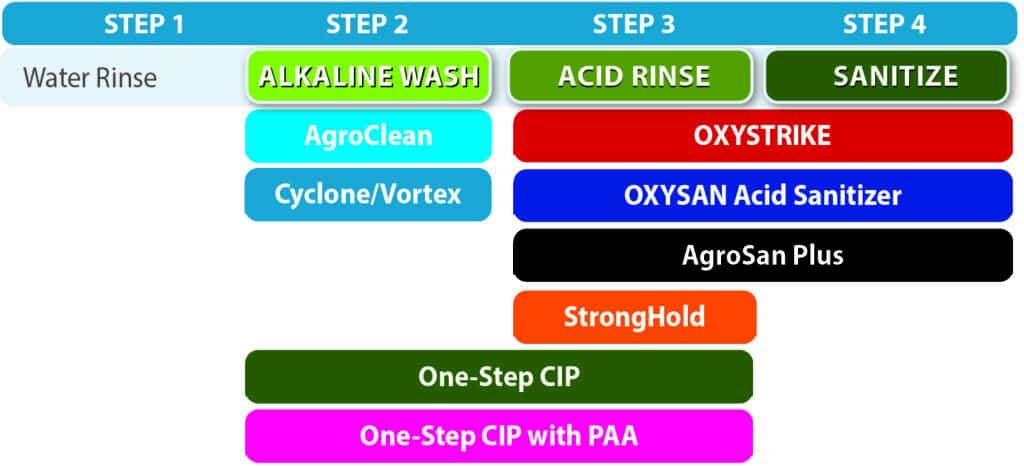
Milking equipment cleanliness and proper functionality play a big role in improving or maintaining a low standard plate count (SPC) or bacteria count. Milk “soils” which challenge milking system cleaning include proteins, micro-organisms, minerals, sugars and fatty acids. It is believed that today’s high-producing cows create six different types of fatty acids, causing additional cleaning challenges. If done properly, the CIP process attacks each of these challenge areas. The process generally consists of four phases: pre-rinse, cleaning (single- or two-step), acid and sanitizing.
The pre-rinse phase is arguably the most important phase during the CIP process, as this phase should remove 90% to 95% of milk’s soils. To effectively remove contaminants, we recommend flushing the system with 110ºF to 120ºF water and keep flushing until the rinse water discharge is clear. It is extremely important that you do not re-circulate this rinse water. If you recirculate the water, you are just re-introducing proteins, soils and bacteria into your system, which is counterproductive.
Many cleaning challenges we find on farms are traced back to inadequate pre-rinse procedures. When the pre-rinse is inadequate, some farms attempt to make up by using a higher concentration of chemicals in the cleaning, acid and sanitizing steps, or do not change anything and live with the high bacteria counts. Using higher concentrations costs the producer more than just money; there’s potential for increased groundwater contamination and possible system damage, including discoloration of stainless steel and damage to plastic and rubber components.
The cleaning phase, which follows the pre-rinse phase, can be either a single-step or two-step process, depending on the detergents selected. Cleaners carry out four basic functions to keep soils in suspension until removal: penetrate soil, lift soil from surface, break up soil into small particles and saponify (decompose) fatty acids.
Not all of these detergents are created equal, and that is intentional, as selecting the proper detergent is a science. The correct detergent and proper usage ratio will depend on factors relevant to the dairy, such as water hardness, iron content, water use, soil type, soil load and size and type of equipment.
The main constant for the detergents is that, in order to be effective, detergents need the correct wash water temperature throughout the wash cycle. Water at the end of the cycle must be a minimum of 120ºF; on most farms, that means starting temperatures need to be approximately 160ºF.
If these temperatures cannot be achieved, producers need to use products specifically designed for lower water temperatures. These lower water temperature detergents are often marketed as
Because detergents (soaps) and chlorine typically leave behind mineral deposits, the acid phase follows the cleaning phase. Acid circulation in CIP procedures is included to remove encrusted protein and salts from the surfaces. Acids are most effective at removing detergents and chlorine residuals. Add just enough acid to warm water (100ºF to 120ºF) to get a pH of 3 to 4. If the acid rinse is 68ºF or lower, use a non-foaming acid. If silicates are present in the dairy’s water, do not let the pH drop below 5.
The final step is the sanitizing phase. To comply with Pasteurized Milk Ordinance (PMO) regulations, circulate an EPA-registered sanitizing solution, according to the manufacturer’s guidelines, no more than 30 minutes prior to the next milking shift. If producers follow the recommended sanitizing phase, 99.9% of bacteria should be eliminated.
It should be noted that there are many different chemicals which can be used as a sanitizer. Each of them have their own benefits and should be looked at accordingly. Some may or may not be compatible with your system, which could lead to corrosion.
Those are the basic steps for CIP. Now chemistry has evolved over time, which is a good thing. Some companies have been able to create products that combine the cleaning and acid phases, and others have a product that can combine the acid and sanitizing phases. When used properly, these products can help reduce time, overall chemical use, energy and water, as some of these products are no-rinse solutions.
Additionally, as dairies start installing robots, check with the manufacturer for what types of products will work with the robot. Some of these robots do not work well with chlorine and could damage your investment.
Some companies have also developed “shock treatment” additives for your system. While some of these do work, they are not meant to be used as an alternative to a proper CIP cleaning procedure. I repeat, do not rely on shock treatments, as they only delay the inevitable. They are good for the occasional treatment but are not meant to be a final solution to soil buildup. A consistent CIP process after milking is the best way to ensure clean lines and a step toward those milk premiums.
It doesn’t matter if you have a typical milking system or robots; over time, protein, fat and mineral buildups occur in pipelines. Proper cleaning procedures should reduce or eliminate buildup. Strive to clean the system with a consistent, cost-effective and environmentally friendly procedure.
In summary, remember that several factors impact cleaning – time, temperature, chemicals/concentration, mechanical effect, water quality, soil being removed, type of surface being cleaned, cleaning method and people. To maximize cleaning effectiveness, make sure each factor is performing at its optimum.
Just like all the tasks on your farm, it takes teamwork to maintain an efficient and properly functioning milking system that fosters quality milk production. I recommend working with your milk cooperative field representative, veterinarian, financial adviser, equipment service technician and chemical company representative to set standard operating procedures for the dairy’s employees and monitor the results. The team should meet (at least) once a quarter to review results and progress and develop and implement any necessary new action steps to improve quality milk production.
Whether you are at home or at work, it is important to keep areas free of germs to try to prevent the spread of diseases. When it comes to this, the words clean, sanitize, and disinfect are often used interchangeably. But there is a significant difference between the terms, and technical differences as well. Additionally, knowing the difference between them can help you to know exactly what products to buy, and how to use them to keep your home or workplace clean, safe, and healthy.
It is important to note however that before you sanitize or disinfect you need to clean the surface first. Germs can hide underneath dirt and other material on surfaces where they are not affected a sanitizer or disinfectant. Dirt and organic material can also reduce the germ-killing ability of some sanitizers and disinfectants. Typically, cleaning is the first step toward the goal of creating a hygienic environment.

Cleaning refers to simply removing dirt and other impurities from a surface. To effectively sanitizes, and/or disinfect; a surface needs to be clean. Once the surface is clean, the sanitizer or disinfectant can better do its job of reducing or eliminating harmful bacteria.
Sanitizing is a treatment that lessens and even kills germs on surfaces to make them safe for contact. The two most common sanitizer types are:
Disinfection requires a stronger treatment than a sanitizer. A disinfectant must completely eliminate specific pathogen(s). Both disinfecting and sanitizing are a step up from regular cleaning because cleaning only removes visible dirt. When you sanitize or disinfect, you are removing potentially harmful pathogens that might not be visible to the naked eye. In order to have a product be classified and be able to be marketed as a sanitizer or disinfectant for hard surfaces they must be EPA Registered and must have data supporting the claims
Now knowing the difference among the various disinfectant types, you can raise the question when should you sanitize, and when should you disinfect? The answer to this question will depend on your objective: Do you have a specific pathogen(s) you want to target? In these uncertain times; the Covid-19 virus is one of the most targeted of all pathogens. You can check to determine if your disinfectant is capable of disinfecting Covid-19 by checking the EPA List N. Disinfectants on this list satisfies the EPA requirements for disinfecting this viral pathogen. Beside Covid-19, EPA has 14 other lists that might be useful in selecting the right product for your objective. Overall, disinfecting can lower the risk of infections from other pathogens like influenza, HIV, Staph or Salmonella.
Creating a clean, safe, and healthy environment requires discipline and the right set of products. Clean is good but often you need to go beyond clean to create a hygienic environment by disinfecting or sanitizing your surroundings.
Teat dip is an integral part of keeping good milk quality numbers. There are many methods to apply the dip and an even greater number of germicides to choose from today.
Add to that the variations of milking routine, and you have lots of ammunition for debate among farmers as to what is best.
Now, once you have determined what is best, can we do that efficiently and at a volume and cost that fits today’s market? Let’s examine a few options for best efficiency in teat dips.
When it comes to efficiency, we can start with the one rule of teat dip that seems to be ignored the most. It also works for all methods, germicides and routines.
That rule is: Get the dip on all of the teats.
When visiting farms to troubleshoot milk quality issues, more often than not, I can spend time watching the application, be it pre-dip or post-dip, and see a problem. The dip being applied misses at least one teat. It does not matter if it is a teat scrubber, foamer, sprayer or dip cup. If the operator is not paying attention or moving too quickly, they will be missing the opportunity of last defense before the milk hits the tank.
Applying dip to the udder instead of the teat means efficiency is lost in wasted product. If it misses the front right teat every time, efficiency is lost to increased mastitis costs. Using a method that best fits the time the milkers have to do the work well will bring about results.
We can increase efficiency in teat-dip usage in several ways:
These strategies can help you make the most of your dip of choice, but only if the dip is actually making it on the teat. Start there if you have concerns.
Artile originally appeared in Progressive Dairyman.
When a farm begins a footbath program, a lot of thought and evaluation goes into it. What chemicals to use, where to place the bath and the type of bath are all considerations.
On top of that, they must decide whether to use a footbath dosing system or to manually mix the solution, as well as who will be in charge of running the bath.
But there’s one decision many fail to add to this list: What time of day should you run the footbath? The most common idea is to run the bath when you have workers on the farm to run the bath. If you have workers on the farm, the odds the bath gets used, in theory, should increase. Now, most of the farms I work with run the bath during the day. However, a farm that previously had minimal wart problems started seeing some issues.
With this, I went to the farm to investigate what was happening. The farm was currently running product three times a week through a footbath dosing system to ensure the proper mixture was added to the bath each time. The product being used was one they had been using for over a year, and it had served them well by solving the previous wart problems they were experiencing. Their protocol was to run the bath during the second milking on those three days, which was peak time for workers on the farm.
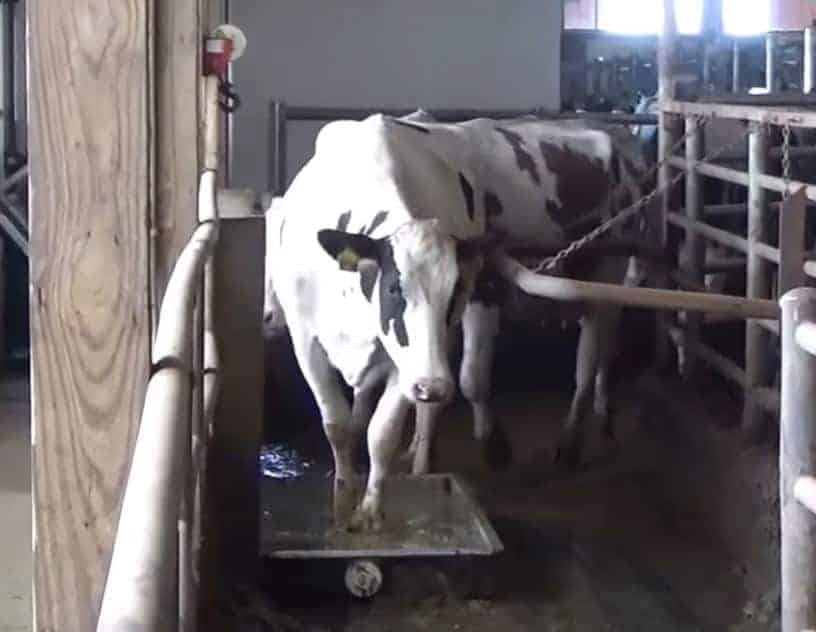
Knowing this, I went to the barn where they had the footbath, and I set up my phone on a selfie stick, set it up to record the barn, and I sat down to watch the operation for an hour or so. From observing with my own eyes, I noticed:
As I sat there observing and troubleshooting, I thought my recommendation would be to increase the number of days the farm runs a footbath because, obviously, the current footbath program wasn’t working at the moment. I believe that is the number one conclusion most of us would assume. I then went around the farm to do a few more tasks and talked to the vet and breeder who were also on the farm at the same time, just to catch up. After a while, I went to retrieve my phone, which was still recording in the barn. I told the herdsman that I would come back again tomorrow to see if I could notice anything else before recommending any changes.
That night, I pulled the video up on my phone, put on my headphones, and watched the video to see if I missed anything or if I overlooked a detail in the moment. A few things I noticed were:
After watching the video and looking over all my notes, I had a new idea: Let’s try switching the footbath routine to the third milking.
My thoughts behind it were pretty simple.
I told the herdsman what I wanted to try, and he was on board to give it a shot. We agreed for the next month we would run the footbaths at night to see if we could get the warts under control with the same product and dosage. We didn’t need the labor to run the bath, as this farm was running a footbath dosing system which we re-programmed to fill and auto-replenish at night.
Because of this, we were confident the noise produced by the day shift would not be a factor. I told him I would be back in a few weeks to check on the operation, but if he noticed the issue wasn’t improving to call me and I would be over as soon as possible.
A month later, I returned to the farm about an hour before the night milking was scheduled to start. As I pulled up, the herdsman had a huge smile on his face and told me the warts were gone. He brought me right to the barn. We set ourselves up near the end of the alley, and then the cows started coming. The flow was smooth, the cows were going through the bath and getting proper dunks. No one was sprinting or standing in the bath, and the soil loading in the bath was reduced.
Also different from my last visit during the daytime, at night there were fewer people around and fewer tasks being performed around the barn. Vets, breeders, and trimmers are normally there during the day, not at night. Cows weren’t being moved around and sorted. Instead, they were able to just walk through the barn, through the bath, and to the parlor. No outside distractions, noise, or stress.
The herdsman was very pleased with the results and continues to run this program. Running the bath at night worked for this farm and improved their hoof health. Every farm has its own unique circumstances and variables that need to be considered. This is just one example where we made the switch and it was successful. It should be noted, however, that if you want to run a nighttime footbath, it is imperative that you have a footbath dosing system that will run the bath for you, or you will need to make sure you have an extremely reliable and trained worker running your bath to make sure it’s actually being run.
Article originally appeared on https://www.progressivedairy.com/topics/herd-health/how-a-nighttime-footbath-fixed-one-farm-s-digital-dermatitis-problem
When it comes to the costs of your footbaths, there’s more to it than just the sticker price.
Many dairy producers are looking for ways to cut back on costs, and hoof care products are no exception.
More times than not, I have seen farms that only look at the “sticker” price of products and try to switch to more “economical” options for their herd. When it comes to footbath additive options, the price per barrel can vary greatly.
Now with such broad price ranges on products, we need to understand something. Not all products are the same. Some are an aldehyde, a form of copper sulfate or a zinc-based product. Even products that are marketed as the same, such as liquid copper sulfate, are not the same, as the concentration level can vary.
Instead of looking at the sticker price alone, I recommend looking at the cost per cow pass for footbath products. Looking at your footbath this way is more effective and lets you see a broader picture of your operation. With this perspective, you are looking at the cost for the product, dosage amounts, cow passes before change-out/replenish and how you fill the bath.
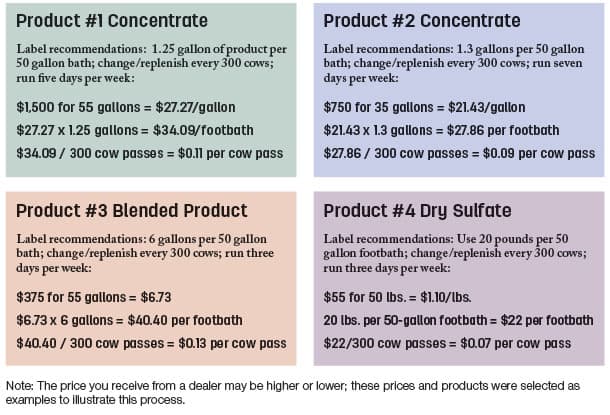
Above are a few examples based on retail prices published online for a few popular products on the market to show how we can calculate cost per cow pass based on barrel price and the recommended dosage and frequency of the bath.
Note: The price you receive from a dealer may be higher or lower; these prices and products were selected as examples to illustrate this process.
If a dairy manager only looked at sticker price of the four footbath products and wanted to try to save money, they would have chosen Product 3 or 4. However, once we broke down the cost per cow pass, a switch would actually cost money based on cost per cow pass if the products had the same weekly usage. The dairy would go through five drums of Product 3 before they would need to reorder Product 1. This is why it’s important to take the time to really break down the cost of the product when you are looking to see where you need to and can cut back on cost.
See Our Footbath Dosing System
Now that you have that broken down, let’s look at the label again (or talk to your chemical supply representative) to determine how many baths per week to run with that product at the recommended dosage to see and maintain results. Some products will require a bath every day at the recommended dosage to be effective, while others may only require three baths during the week. Table 1 demonstrates the recommended weekly usage of the products.
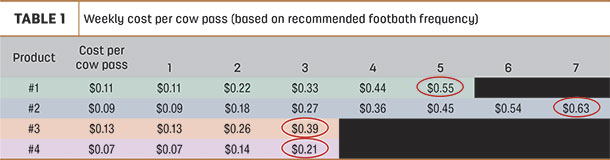
Note that Product 1 needs to be run five days a week, Product 2 needs to be run every day, and Products 3 and 4 only need to run three times per week.
Now we see a clearer picture of the real cost of a footbath product. There are still a few variables remaining, especially if a dairy has more than 300 cows. The main variable remaining is replenishing the footbath (Table 2).

Some products simply require that more be added to replenish the bath, which can be done while maintaining cow flow. Others require an entire bath change-out due to inorganic material polluting the bath which disrupts cow flow, so you can test the pH and mix the product together.
How change-out and replenishing are handled can greatly impact your cost per cow pass. Additives that just need to be added to the bath to maintain its efficacy will remain relatively close for the cost per cow pass and can even be lowered if you have an automated footbath dosing system installed. For products that require a complete change-out or pH testing before being re-used, the cost will increase with additional manual labor cost, testing strips and impaired cow flow. In Table 2 is a chart based on a 1,000-cow dairy I have consulted based on replenishing the bath.
Products 1, 2 and 3 were all able to be used with an automated footbath dosing system. However, the amount needed for replenishing the bath varied among the products in order to maintain the bath’s efficacy due to soil load. Product 4 could only be replenished manually, which drove the cost up immensely.
As you can see from these quick examples, the cost of your footbath regimen is a lot more than just the sticker price. It is worth the time to take a deeper dive into your products’ cost to gain a clearer picture.
Source: https://www.progressivedairy.com/topics/herd-health/how-to-calculate-the-hidden-costs-of-footbaths
See Our Online Footbath Brochure
Winter brings many challenges to a farm operation. One area I receive constant questions about is winter teat health. Many factors can go into what type of dip to use, but we must always remember why we dip in the first place.
The purpose of teat dipping is to provide a germicide that will kill mastitis germs and apply skin conditioners that keep teat skin and ends healthy. These are both essential to minimize mastitis risks. In winter, we want these same things, but we want to make sure that when we dip, we don’t compromise one for another (frozen teats, more germs on teats). Damaged teat skin brings about opportunities for mastitis. In the winter, the skin condition can change dramatically in as little as two to three days, causing even faster damage from actual freezing.
Many dips will provide adequate protection to temperatures near the freezing point; however, windchill can still cause issues, even in fairly warm temperatures. The first step in protection comes before we even get to dipping the cows. Do your best to protect all cows from the wind by closing all areas possible. Keep the bedding conditions dry and clean. Lastly, remove any areas that puddle water or manure to keep from any opportunity to splash up to the udder.
Now that we are refreshed on why we dip, here are some common questions I receive about dipping during winter.
Can I use the same dip I have been using?
Most days, it’s not cold enough to freeze the drop on the teat end, so in short, yes you can. In other situations (cold wind chills and/or direct exposure post-milking), dab or wick the drop off the end with a cloth towel. This takes very little time and effort. Do not dry the teat as it removes the dip/conditioners. This has been proven to work.
What if I have been using barrier dips?
Certain barrier dips tend to be more of a slow-drying option due to film-forming characteristics. A slower-drying dip can leave wet teats exposed while the cows are returning to their holding areas; thus, it is generally not recommended. There are some barriers, however, that have fast-drying components or are specifically designed for winter application. Check with your chemical representative for the best options if you want to use a barrier.
Can I add extra emollients on my own?
Never add extra conditioners to dip on your own. The saying “too much of a good thing” can hold true with some emollients. Formulation matters. The wrong combination could cause more harm than good by reducing the kill of your dip package or by actually pulling moisture from the teat rather than the air. Check with your manufacturer representative as to the proper formulations and quantities.
What about teat dips marketed for winter use? The ones with high emollients?
I know the real reason this question gets asked. Reading between the lines, I will rephrase the question – “Winter dips are expensive, do I really need them?”
Winter dips are specifically designed for extremely cold conditions. Not only to protect your cows from the cold but to also protect the teat skin from the effects of windchill. Temperatures can hover around the freezing mark, and your traditional dips will be just fine, but add in the effects of windchill and the reflected temperature on the skin can drop to well below freezing, thus causing teat damage. Think about how dry and cracked your hands or feet can get in the winter, especially if they are exposed to wet conditions and then the dry winter air regularly. The same conditions affect cows’ teats.
Dry and cracked teats can easily harbor more bacteria and keep the teat sphincter from closing as quickly and completely as healthy teats. Winter dip formulations are high-emollient dips (usually 50% or greater in skin conditioners). These additional conditioners slow evaporation and thereby reduce the risk of teats freezing. They keep the teat bathed in a rich coating of skin conditioners that will replace the lost oils in the skin and provide protection for the teat.
So now about the expense. Yes, they are more costly than your traditionally used products, but are they more expensive? When it comes to the overall cost of teat damage and the related costs in mastitis, lost milk and possibly losing additional lactations of a cow, the money adds up quickly. This makes the “insurance policy” aspect of winter dips more desirable. To keep your costs in check, install a large thermometer outside of your milking areas. Determine the best temperature for your geographical location and the conditions at your facility to implement the “winter dip rules.” When that temperature is reached, use winter dips. When it goes back above that temp, go back to your traditional methods. The temperature fluctuates daily and with the proper program, your post-dip method can work as well to keep your costs in check.
What about quitting dipping/doing nothing else?
To quit dipping is a poor choice and one that is not the best for your cows. If you do not have a high- emollient dip, there are options. Use your traditional product to dip the cows and dab off the drip at the end of the teat or slow down releasing the cow back to the barns to allow the teat dip time to dry while they are in the warmer parlor area. Teats are still wet after milking from being bathed in milk in the liner. Do your best to get some kill and conditioners to them. A little bit of conditioners and kill on a dry teat is still better than no dip at all.
I have the proper dip. Now what?
It is not only the dip used in the winter that makes the difference. Make sure every aspect that can cause teat condition issues is addressed.
Is the equipment up to par? Many farms do their maintenance in the winter when the crops do not need attention. Be sure pulsation, vacuum, and take-off settings are all within National Mastitis Council guidelines for comfortable milk-out. Prepare the barn environment. Is the barn sealed up for the winter season? Is the ventilation sufficient but not enough to bring a wind chill? Are the beds all dry and cleaned often enough?
As I stated earlier, make sure you have a plan. Be sure the staff knows as to when to implement winter dipping rules and what products they are to use. Make it ready and easy to access for a seamless transition.
A final note, it’s important that your milkers are educated on the challenges associated with winter weather’s effect on teat tissue. Rough teat ends (hyperkeratosis) are more difficult to get clean. Milkers need to wipe teats in a downward, twisting motion on each teat, working from the farthest to the nearest. It’s important they also make a second wipe, applying pressure across teat ends to help remove excess keratin buildup that is ready to come off, and properly clean teat ends. Milkers should closely inspect teat ends to make sure they are clean before attaching the unit. Instill a “rub, no pick” policy when cleaning teat ends.
With these considerations in mind, continue keeping milk quality and udder health as top priorities despite the windchill factor.